Quick Start: PX4
Note
SkyHub does not support True Terrain following with PX4. SkyHub works only as a data logger for payload sensor using position data from PX4 autopilot.
Connection with SkyHub during the flight can be established only if UgCS desktop is used as ground control software.
Hardware requirements
- SkyHub v3 device.
- Drone running PX4 flight controller with firmware version 1.7+
- Mounting parts to install SkyHub.
- SkyHub3 cable for Pixhawk autopilot or cable provided by drone manufacturer to connect SkyHub with autopilot.
- Power output (according to SkyHub required input power).
Software requirements for the Windows PC
- UgCS v5.13.0 or higher (referred to below as UgCS)
- UgCS Custom Payload Monitor v4.3.0 or higher (referred to below as UgCS-CPM)
- QGroundControl for the PX4 configuration.
- WinSCP (optional) to access the SkyHub file system for advanced configuration.
UgCS desktop download and setup process
- Download the installation package.
- Run the setup file.
- Read and acknowledge the license agreement.
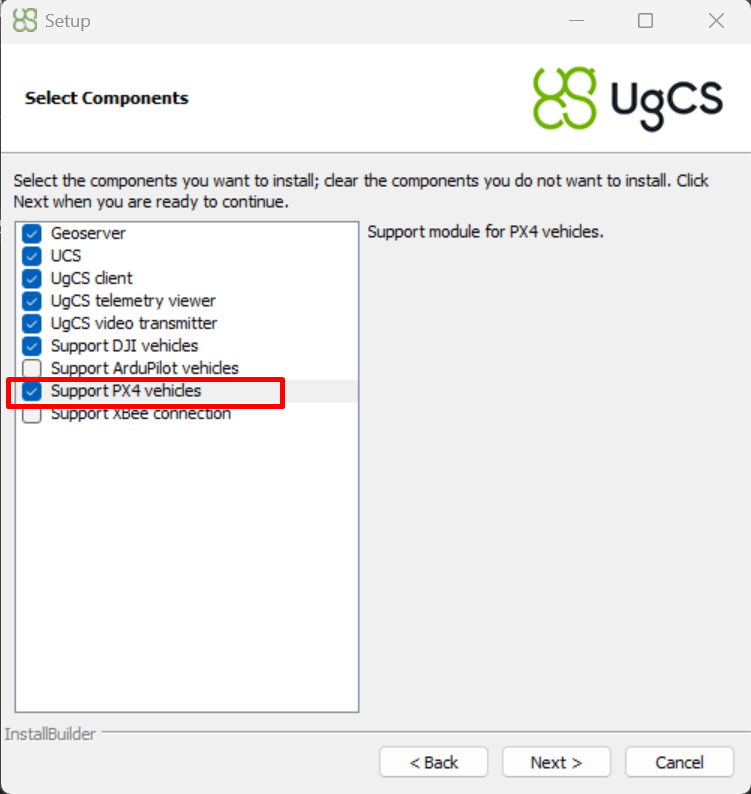
- In the component selection tab, select PX4 to install the necessary autopilot compatibility.
- Installation complete.
UgCS Custom Payload Monitor download and setup process
- Download the latest available CPM version.
- Run the setup file.
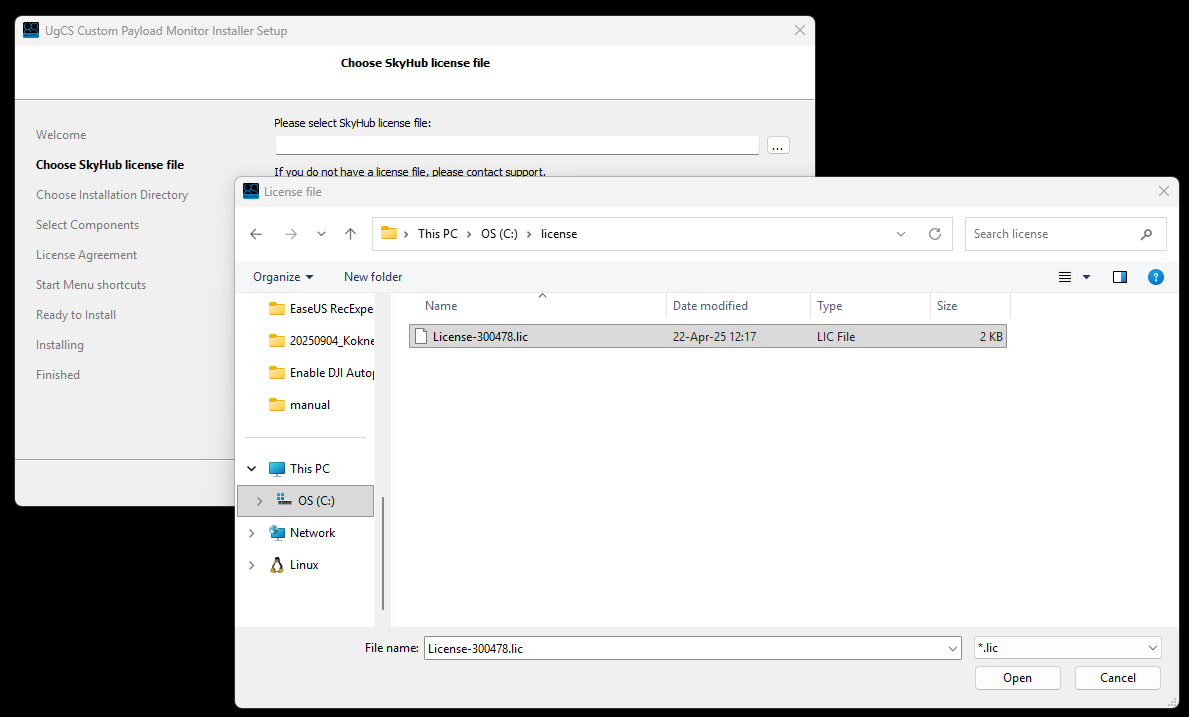
- Select the SkyHub license file for the SkyHub you will be using.
- Read and acknowledge the license agreement.
- Installation complete.
Note
If you do not have a license file or need a new one, please reach out to us at support@ugcs.com and provide your SkyHub serial number.
Physical setup
Caution
Power off the system when connecting cables. To avoid short-circuiting or causing potentially harmful power fluctuations, it is recommended to power off the entire system before performing any cable plug-in or unplugging. Some of the payload sensors used are extremely sensitive to power changes and may be damaged.
- Mount SkyHub on the drone in a safe, fixed position.
- Connect SkyHub Connector #3 (red) to the flight controller using the SkyHub 3 cable for Pixhawk autopilot.
- Connect SkyHub to a power source.
Autopilot configuration
- Make sure UgCS version 5.13 or higher is used (download links can be found in the Prerequisites section) and VSM for PX4 vehicles is installed.
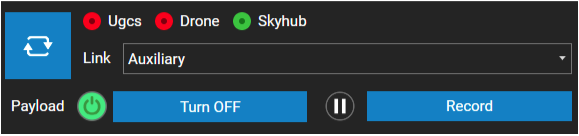
- Establish an Auxiliary connection between UgCS-CPM and SkyHub. See Preparation guide for instructions.
- When the Auxiliary link is established, you should select it from the Link menu in UgCS-CPM.
Note
The following functionalities are available when SkyHub is connected via the Auxiliary link:
- Widget configuration in UgCS-CPM.
- Data from payload in widgets.
- Data download from SkyHub.
- Firmware upgrade.
- SkyHub configuration.
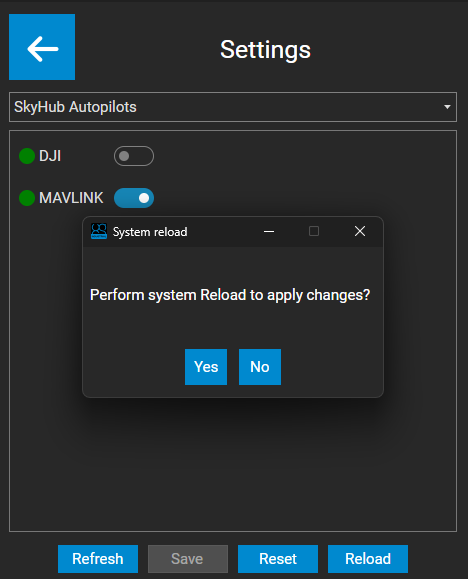
- Enable MAVLink autopilot on SkyHub.
In UgCS-CPM, press the “Settings” button, choose “SkyHub Autopilots” from the menu, and enable “MAVLink”. Press Save and choose to reload the system to apply changes.
- Restart SkyHub.
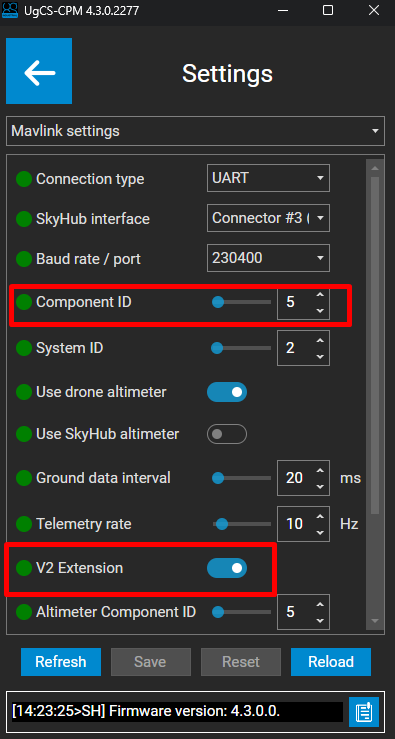
- Make sure that the UgCS PX4 VSM parameter
vehicle.px4.custom_payload.onboard.component_idis equal to theComponent IDvalue in the MAVLink settings within the UgCS-CPM. - Make sure that the V2 Extension parameter is enabled.
- If SkyHub is connected to telemetry port 2, open the QGroundControl application, then go to Parameters -> MAVLink and set the parameter
MAV_1_CONFIGtoTELEM2.
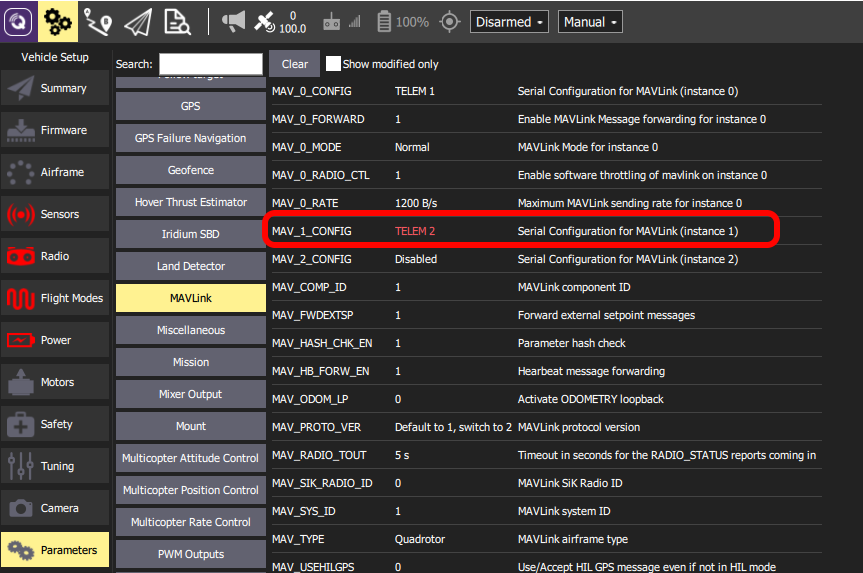
- Restart the autopilot.
- After a restart, data forwarding for
TELEM2autopilot telemetry ports should be enabled. Set the parameterMAV_1_FORWARDto1.

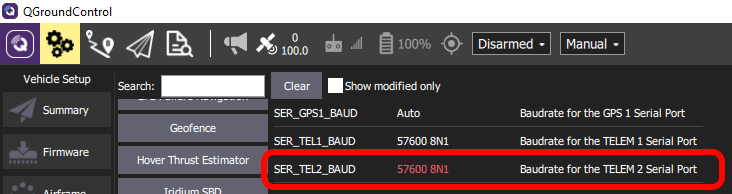
- Change the baud rate for the TELEM2 Serial Port (recommended 230400). Speed should be the same as configured on the SkyHub side in the MAVLink settings within the UgCS-CPM.
Note
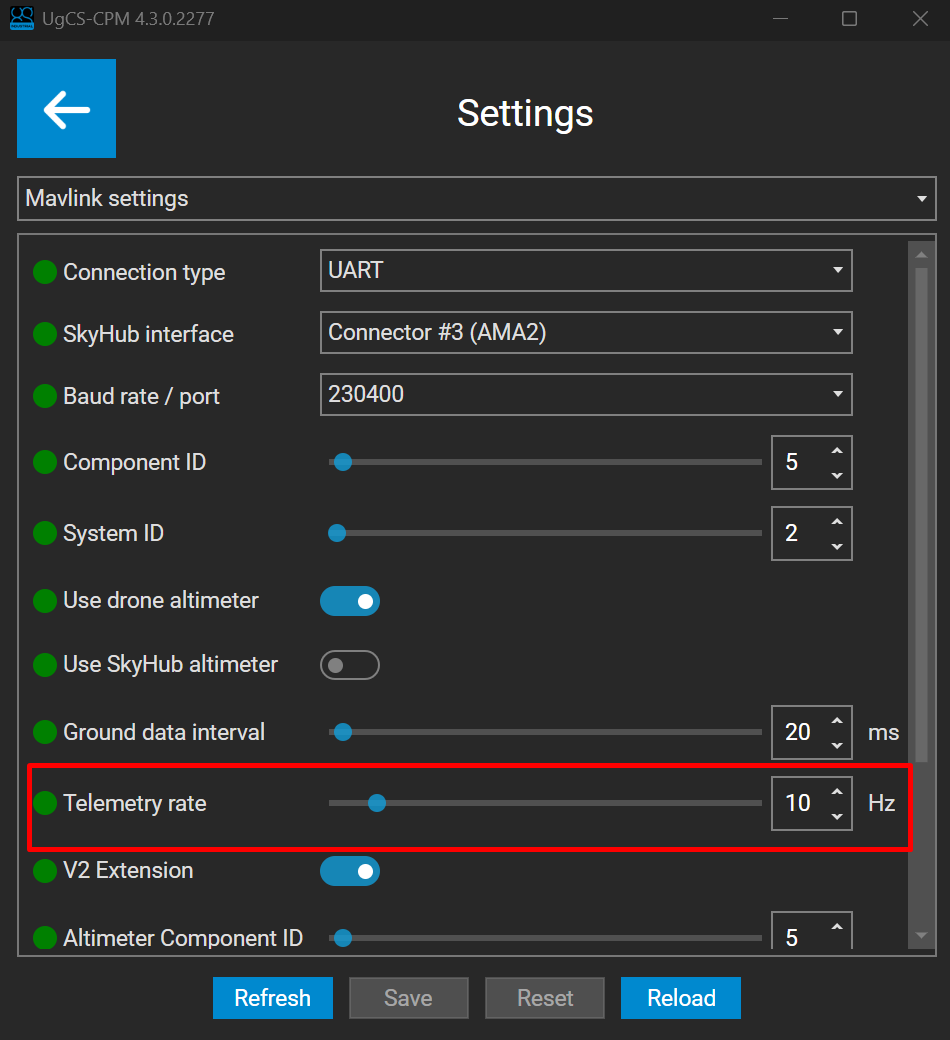
SkyHub subscribes to the following MAVLink messages with telemetry rate defined by the Telemetry rate parameter in the MAVLink settings within the UgCS-CPM:
GPS2_RAW; GPS_RAW_INT; GLOBAL_POSITION_INT; ATTITUDE; SYSTEM_TIME; HEARTBEAT; DISTANCE_SENSOR
Altimeter setup
Caution
SkyHub does not support True Terrain Following on PX4. Altimeter readings are shown in the widget purely as a visual reference and do not affect flight control.
Info
There are two possible ways the Altimeter can be attached to the PX4 drones:
- Connected to the SkyHub Connector #1.
- Connected directly to the drone.
When the altimeter is connected to SkyHub
- Connect the altimeter to the SkyHub Connector #1 (yellow).
- Navigate to the “Payload” section.
- Enable the driver for the Altimeter you will use, and confirm the reload.
Note
In this example, we will use the US-D1 model.
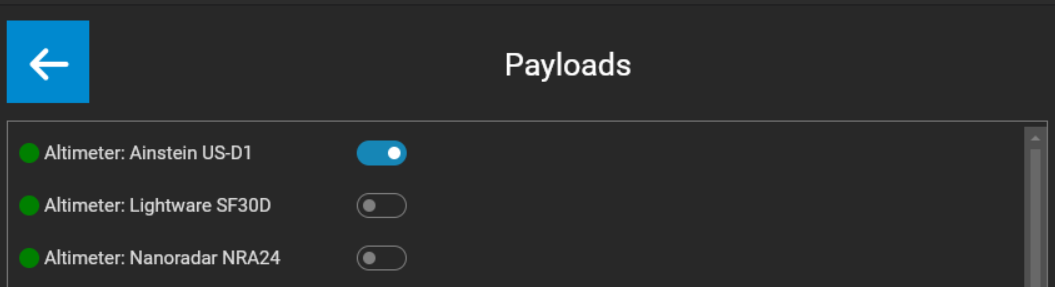
- Next, in the UgCS-CPM software, navigate to the “All settings” section.
- From the drop-down list, select “Mavlink settings”.
- Make sure that the “Use SkyHub altimeter” option is enabled.
- Make sure that the “Use drone altimeter” option is disabled.
- Click the “Save” button and confirm reload.
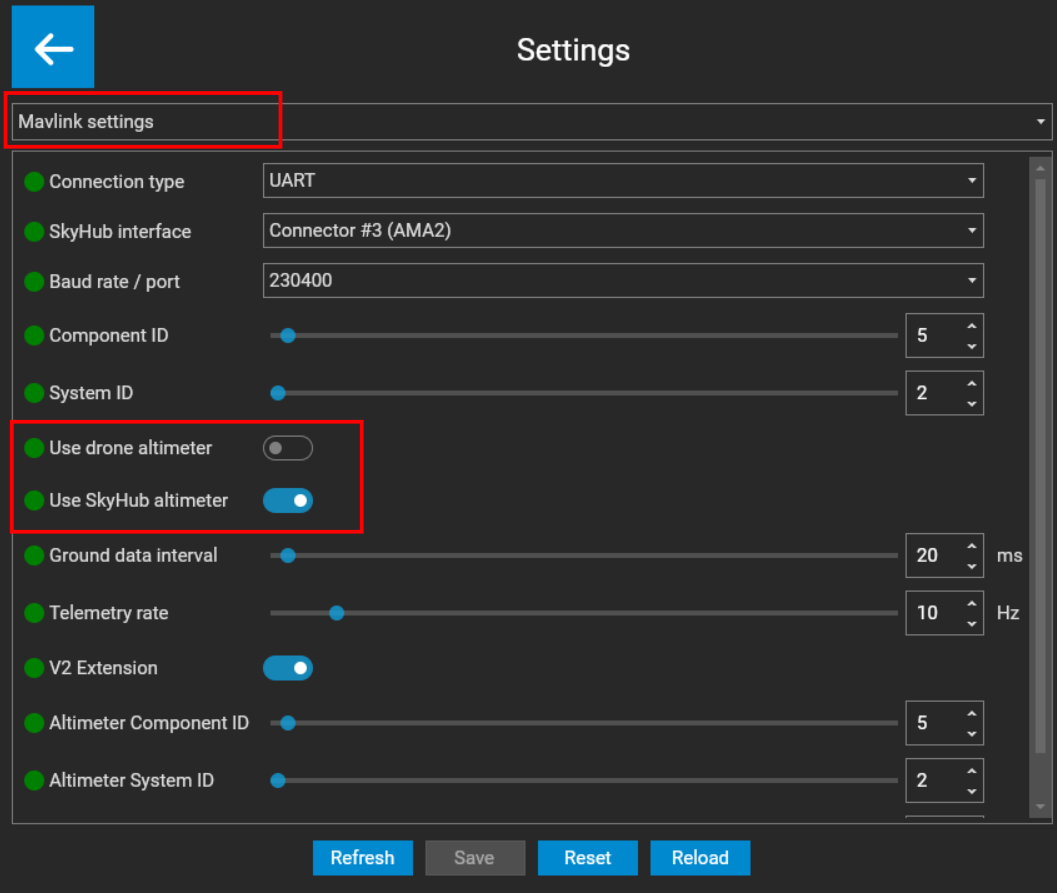
- Click on the drop-down list once more, and select the “Altimeters” section.
- Set the default altimeter to your model (in our example, Ainstein US-D1). Click “Save” and confirm reload.
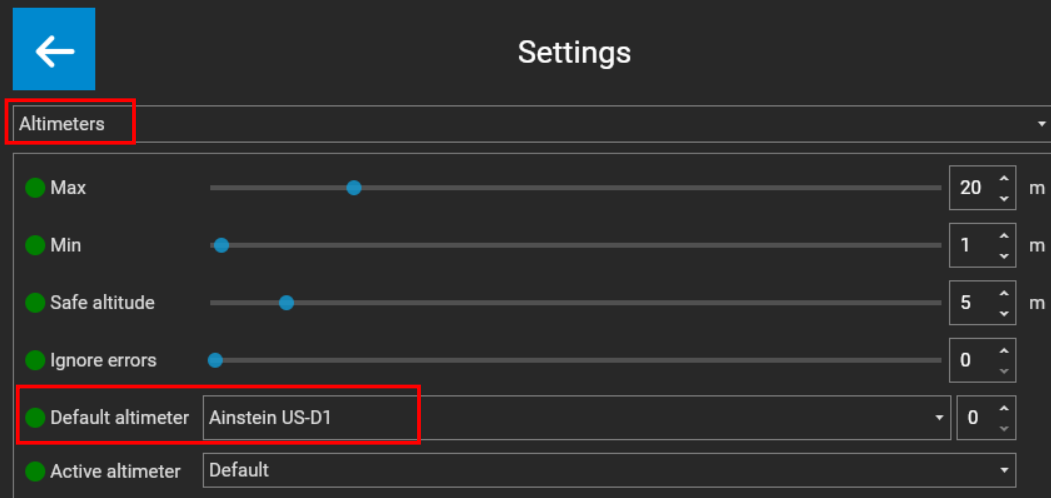
- Go back to the main menu and click the “Start” button.
- From the drop-down list, select your altimeter (in our example it is “Altimeter: Ainstein US-D1”) and press the “+” button.
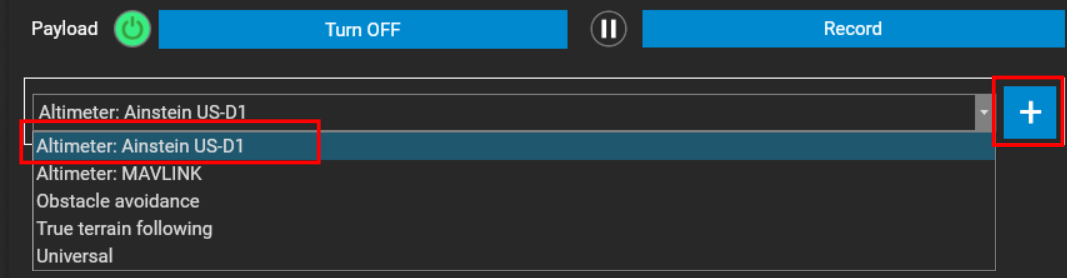
- Altimeter configuration is complete.

When the altimeter is connected directly to the drone
- Connect the altimeter to your drone.
- In the UgCS-CPM software, navigate to the “All settings” section.
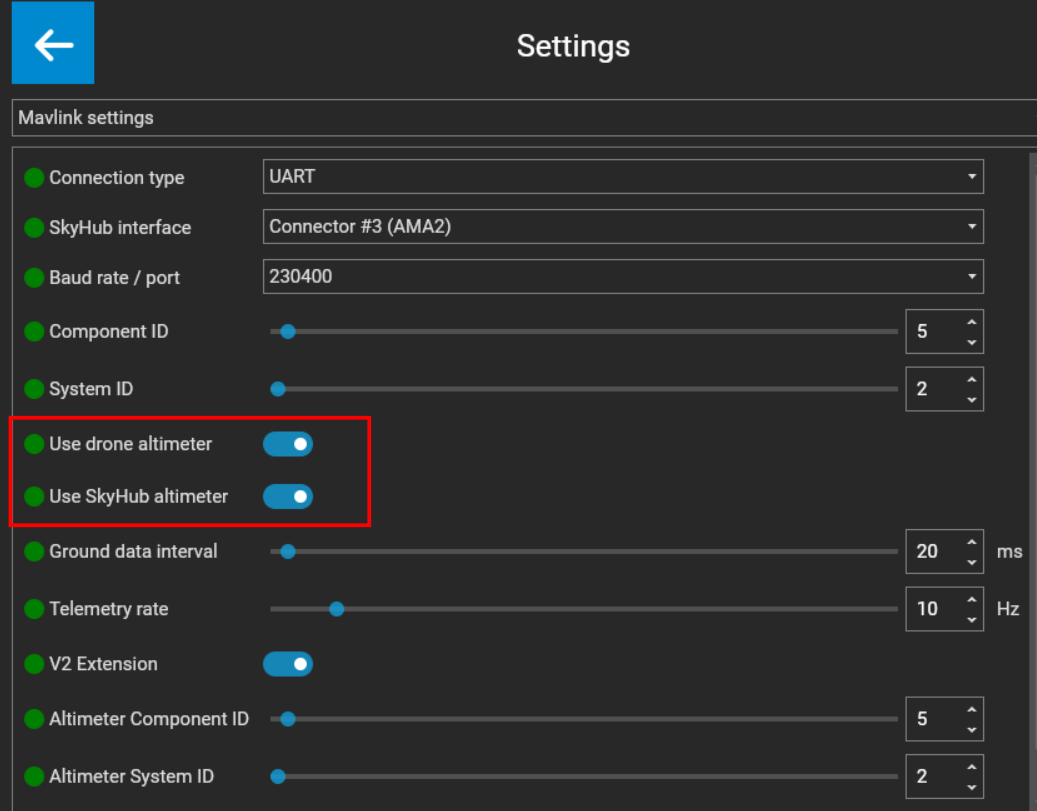
- From the drop-down list, select “Mavlink settings”
- Make sure that the “Use SkyHub altimeter” option is enabled.
- Make sure that the “Use drone altimeter” option is enabled.
- Click the “Save” button and confirm reload.
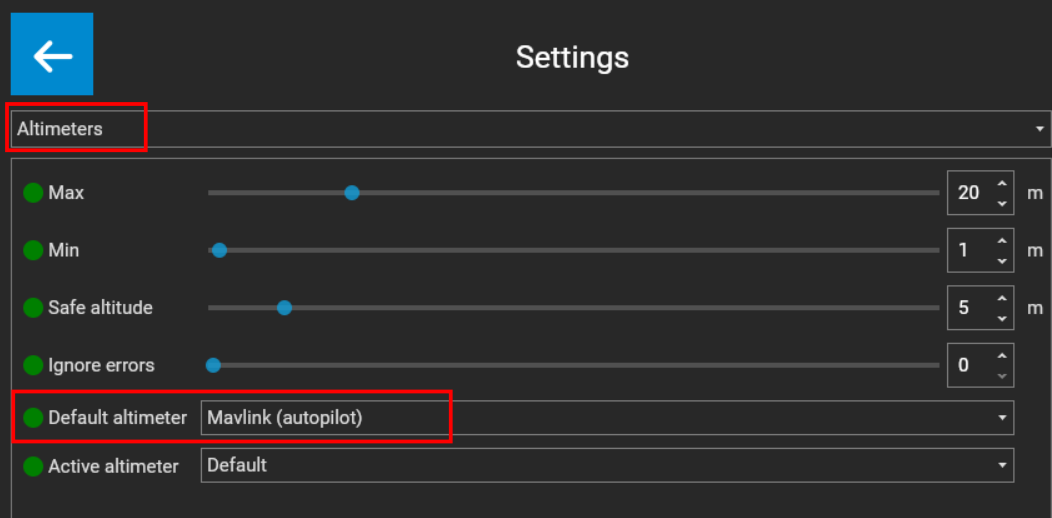
- Click on the drop-down list once more, and select the “Altimeters” section.
- Set the default altimeter to “Mavlink (autopilot)”. Click “Save” and confirm reload.
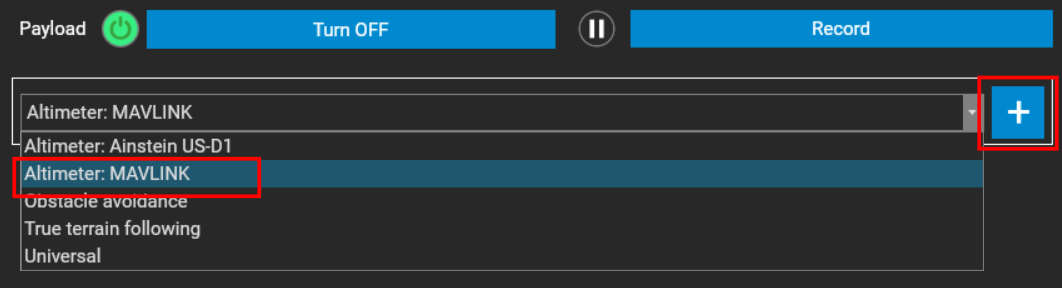
- Go back to the main menu and click the “Start” button.
- From the drop-down list, select “Altimeter: MAVLINK” and press the “+” button.
- Altimeter configuration is complete.
